
 Search Here
MISC
Parts List
Robot Forum
Chat
Member Pages
Axon MCU
Robot Books
Shop
Contact
SKILLS
How To Build
A Robot
Tutorial
Calculators
Mechanics
Programming
Miscellaneous
Robots
Space
HARDWARE
Actuators
Batteries
Electronics
Materials
Microcontrollers
Sensors
SCIENCE
Robot Journals
Robot Theory
Conferences

Robot Mapping and Navigation
The theories behind robot maze navigation is immense - so much that it would take several books
just to cover the basics! So to keep it simple this tutorial will teach you one of the most
basic but still powerful methods of intelligent robot navigation.
For reasons I will explain later, this robot navigation method is called the wavefront algorithm. There are four main steps to running this algorithm.
Step 1: Create a Discretized Map
Create an X-Y grid matrix to mark empty space, robot/goal locations, and obstacles.
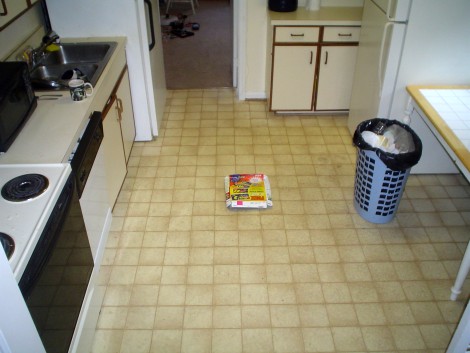
For example, this is a pic of my kitchen. Normally there isn't a cereal box on the floor like that, so I put it there as an example of an obstacle:
Using data from the robot sensor scan, I then lay a basic grid over it:
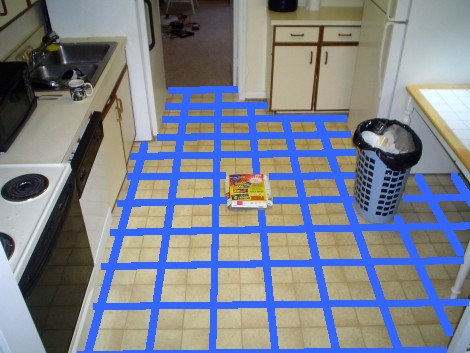
This is what it looks like with all the clutter removed.
I then declare the borders (red) impassable, as well as enclose any areas
with objects as also impassable (also blocked off by red).
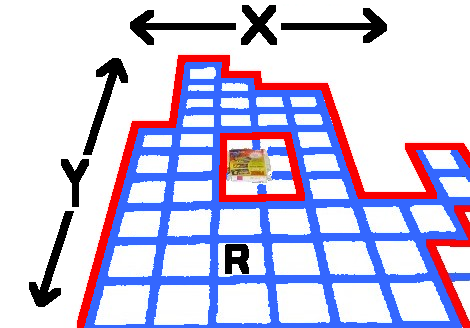
Objects, whether big or small, will be treated as the entire size of one grid unit.
You may either hardcore the borders and objects into your code, or your robot
can add the objects and borders as it detects them with a sensor.
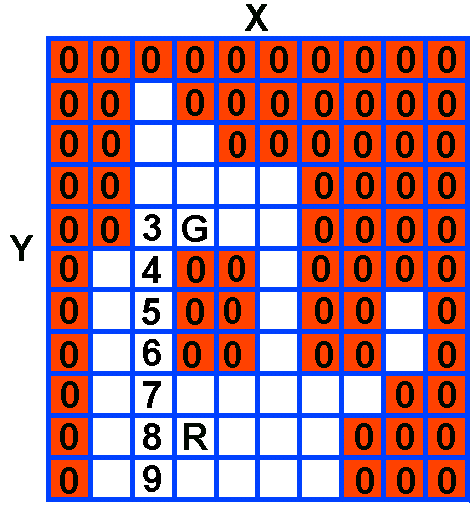
What you get is an X-Y grid matrix, with R representing where the robot is located:
But of course this is not what it really looks like in robot memory. Instead, it looks much more like this matrix below. All I did was flatten out the map, and stored it as a matrix in my code. Use 0 to represent impassable and 1 to represent the robot (marked as R on the image).
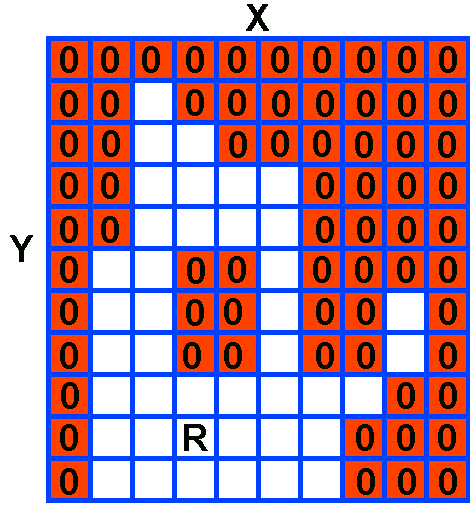
Note: In my source code I used the below values. My examples here are just simplifications
so that you can more easily understand the wavefront algorithm.
// WaveFront Variables
int nothing=0;
int wall=255;
int goal=1;
int robot=254;
An example of a map matrix in C looks something like this:
//X is horizontal, Y is vertical
int map[6][6]=	{{0,0,0,0,0,0},
		{0,0,0,0,0,0},
		{0,0,0,0,0,0},
		{0,0,0,0,0,0},
		{0,0,0,0,0,0},
		{0,0,0,0,0,0}};
Step 2: Add in Goal and Robot Locations
Next your robot must choose its goal location, G (usually preprogrammed for
whatever reason). The goal could be your refrigerator, your room, etc.
To simplify things, although not optimal, we are assuming this robot can only rotate 90 degrees.
In my source code I call this function:
new_state=propagate_wavefront(robot_x,robot_y,goal_x,goal_y);
robot_x and robot_y marks the robots' coordinates, and goal_x and goal_y is of course the goal location.
Step 3: Fill in Wavefront
This is where it gets a bit hard so bare with me here. In a nutshell
the algorithm will check node by node, starting at the top left, which
nodes it is next to. Ignore walls, look at nodes around your target node,
then count up. For example, if a bordering node has the number 5, and
its the lowest bordering node, make target node a 6. Keep scanning the matrix
until the robot node borders a number.
Following this pseudocode Ill show you graphic examples.
Pseudocode:
check node A at [0][0]

now look north, south, east, and west of this node
	(boundary nodes)

if (boundary node is a wall)
	ignore this node, go to next node B

else if (boundary node is robot location && has a number in it)
	path found!
	find the boundary node with the smallest number
	return that direction to robot controller
	robot moves to that new node

else if (boundary node has a goal)
	mark node A with the number 3

else if (boundary node is marked with a number)
	find the boundary node with the smallest number
	mark node A with (smallest number + 1)

if (no path found)
	go to next node B at [0][1]
	(sort through entire matrix in order)

if (no path still found after full scan)
	go to node A at [0][0]
		(start over, but do not clear map)
	(sort through entire matrix in order)
	repeat until path found

if (no path still found && matrix is full)
	this means there is no solution
	clear entire matrix of obstacles and start over
	this accounts for moving objects! adaptivity!
Here is a graphic example. The goal and robot locations are already marked on the map. Now going through the matrix one node at a time, I've already scanned through the first 2 columns (X). On column 3, I scanned about halfway down until I reached the 5th node. Checking bordering nodes it is next to the Goal. So I mark this node with a 3 as shown.

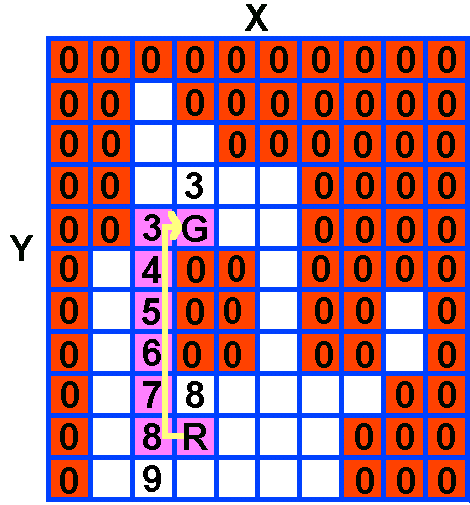
Continuing on the 3rd column, I keep going down node by node. I check for bordering nodes, and add +1 to the target node. As you can see, the rest of the column gets filled in. Notice the 'wave' action, yet? This is why it's called a wavefront. It has also been called the Brushfire algorithm because it spreads like a brushfire . . .
Now go to the 4th column and start checking each node. When you get to the 4th row, your target node borders the goal. Mark it with a 3. Then keep scanning down. Ignore the goal, and ignore walls. On the 9th row, you will notice the target node borders the number 7 on the left. Its the lowest value bordering node, so 7 + 1 = 8. Mark this target node as 8.

Then going to the 10th row you notice the target node is the robot location. If the robot location borders a filled in number (in this case, the number 8) then the algorithm is finished. A full path has been found!
Step 4: Direct Robot to Count Down
Now that a solution exists, tell your robot to drive to the square with the current number minus one.
In this case, the current number was 9, so the robot must drive to square 8.
There are multiple squares labeled 8, so the robot can go to either one. In this case,
the 8 square on the left is more optimal because it results in fewer rotations of the robot.
But for simplicity, it really doesn't matter.
Then have your robot go to box 7, then box 6, then 5, and so on. Your robot will drive straight to the goal as so.
Adaptive Mapping
For adaptive mapping, your robot does not always know where all obstacles are located.
In this case, it will find a 'solution' that might not actually work.
Perhaps it didn't see all obstacles, or perhaps something in the environment moved?
So what you do is:
1) have your robot scan after each move it makes
2) update the map with new or removed obstacles
3) re-run the wavefront algorithm
4) and then react to the new updated solution.
If no solution is found at all, delete obstacles from your map until a solution is found. In my source code, the robot deletes all obstacles when no solution is found - not always desirable, but it works.
Results
To test my algorithm, I put it on my modded iRobot Create platform.
It uses a scanning Sharp IR as its only sensor.
Enjoy! Notice that its an unedited video:
Yes, I do realize I have a lot of cereal boxes . . . I actually have more . . . I like cereal =)
And what you have been really waiting for, the WaveFront Source Code:
iRobot Create WaveFront Source Code (September 9th 2007)
Recursive WaveFront
There is another way to do the wavefront algorithm using recursive functions.
This method I've been told is inefficient, especially on very large maps.
But anyway it doesn't matter because microcontrollers cannot do recursive functions.
This is an animation of the recursive wavefront process:
I won't go in to detail on this, but it's obviously a 'wavefront'!
Wavefront Simulation
It can be quite time consuming to test out robot navigation algorithms on the actual robot.
It takes forever to tweak the program, compile, upload to robot, set up robot, turn it on,
watch it run, then figure out why it failed . . . the list goes on.
Instead, it is much easier to do this with simulation. You write the program, compile, then run it locally. You get an instant output of results to view.
The disadvantage to simulation is that it's really hard to simulate the environment as well as get the robot physics perfect, but for most applications simulation is best to work out all the big bugs in the algorithm.
This is a simulation I did showing a robot doing a wavefront, moving to the next location, then doing another wavefront update. For a robot (R) moving through terrain with moving objects (W), the robot must recalculate the wavefront after each move towards the goal (G). I didn't implement the adaptive mapping in simulation, just the wavefront and robot movement.
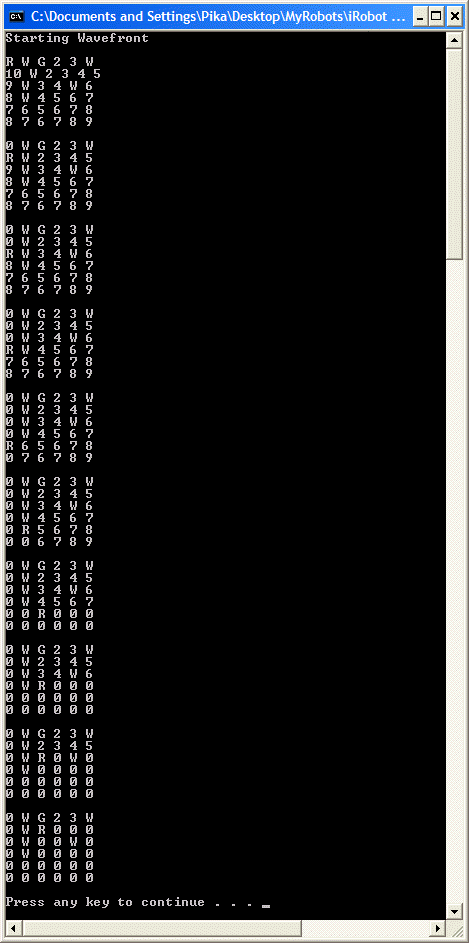
If you want to see the entire simulation, check out the simulation results.txt
You can download a copy of my wavefront simulation software and source. I compiled the software using Bloodshed Dev-C++. If you want, you may also try a different C language compiler.
You can also find wavefront code in BASIC and wavefront in Python posted on the forum.
Society of Robots copyright 2005-2014