
 Search Here
MISC
Parts List
Robot Forum
Chat
Member Pages
Axon MCU
Robot Books
Shop
Contact
SKILLS
How To Build
A Robot
Tutorial
Calculators
Mechanics
Programming
Miscellaneous
Robots
Space
HARDWARE
Actuators
Batteries
Electronics
Materials
Microcontrollers
Sensors
SCIENCE
Robot Journals
Robot Theory
Conferences
STEP-BY-STEP ROBOT TUTORIAL
SHARP IR EDGE DETECTION
Now that you have completed your $50 robot Im sure you want to make your robot do much more interesting things.
What this robot tutorial will teach you today is how to add my Stampy edge detection technology using a Sharp IR Rangefinder so that your robot can now chase down your helpless cat!
It is important that you understand the Stampy algorithm before you continue with this tutorial. Please read it!
So now that you understand edge detection, watch this video to learn how to add range finding to your own $50 robot.
corrections:
when I say 'laser rangefinder' I meant to say 'IR rangefinder'
when I say 'analog output' I meant to say 'analog input'
. . . was too lazy to redo that film just for those mistakes . . .
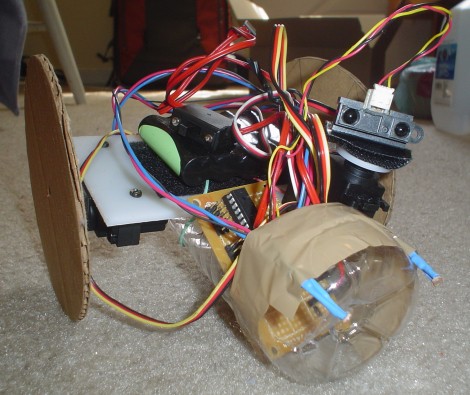
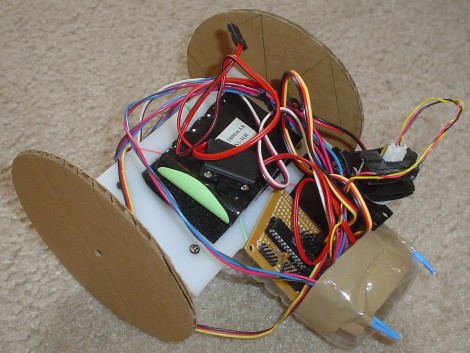
Parts Required and Mounting
There are only two major parts you need to purchase. The first is an additional HS-311 servo (~$9),
and the second is a Sharp IR Rangefinder (~$13). I assume you now know how to locate your
own robot parts, so Ill leave it up to you to find them.
I also expect you to do a much nicer job than I did on mounting your servo and Sharp IR. I did it quick and ghetto so that anyone can do it, but I know you are more competent than me . . . To learn more about mounting sensors, check out my tutorial on mounting sensors. My Stampy robot has plans posted to making your high quality Sharp IR mount for a servo.
You might also be interested in my omni-wheeled robot, Fuzzy, which uses three Sharp IR to do mapping.
AutoCalibration
Just like with the photoresistors version of the $50 robot, sensors MUST be calibrated.
There are two ways to calibrate your sensors, one is by hardcoding in a particular value
discovered 'effective' during trial and error testing. The other method is what I call autocalibration.
Autocalibration is a method that a programmer can use to give his/her robot the ability adapt to any new situation.
It is not a required step, but it is often easier than hardcoding in calibration values.
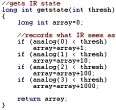
In the following sourcecode, you will see a function that looks like this:
//automatically calculates threshold value before run
void autocalibrate(void)
{
scan_thresh=a2dConvert8bit(3);//sensor reading
}
This code is by far the simplest type of autocalibration. The function autocalibrate() is called only once in main, right when you turn on the robot. After that, the stored value scan_thresh is referenced henceforth as the deciding threshold. If you want to turn off autocalibration, change 'a2dConvert8bit(3)' to a hardcoded number, such as 40.
Uploading Software
Assuming that you remember the basics from the original
programming section of the $50 robot
I wont go into so much detail this time.
Like exactly before, load up AVR Studio and create a new project called 50_robot_sharpIR.
Now that you have a new project, download the source code and unzip it into the folder called 50_robot_sharpIR. Remember, this is just like before with your photovore sourcecode, just in a different folder.
$50 Robot with Sharp IR v1.zip (May 19th, 2007) - Basic Edge Detection
Now we need to load the correct makefile. Makefiles decide what files should be compiled for your robot. I have already done the configuration for you, but you can always have a look at it if you are curious. Each robot I make will have a different makefile, but typically only with small changes made.
In the AVR Studio menu, go to Project -> Configuration Options.
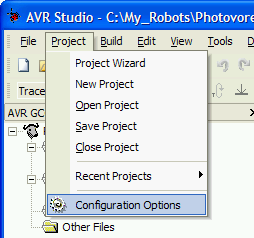
Check the box labeled 'Use External Makefile', then browse for and select the correct makefile in your 50_robot_sharpIR folder. Click OK.
Finally, build/compile your source code, and upload it to your robot. Good luck!

Note: The new SoR_utils.h file is not the same as before. I have added some new features to it, along with some other changes. I did NOT make it back compatible, so chances are your robot might turn left when you tell it to go right. Or maybe go reverse when you tell it to go straight. To fix this, just reverse your servo wires, OR change the speed numbers in software.
On that note, let me now tell you about the new functions I added. Now you no longer need to concern yourself with speed numbers (although you can if you still want to).
To have your robot turn left, just call the function robot_turn_left();. It shouldn't take much imagination to figure out what the functions robot_turn_right(); and robot_go_straight(); do . . . Enjoy!
Got questions or comments? Post them on the robot forum!
Have you finished making your $50 Robot and want to share your experiences? Or want to see what others have done for ideas? Check out this $50 robot forum post.
Society of Robots copyright 2005-2014