
 Search Here
MISC
Parts List
Robot Forum
Chat
Member Pages
Axon MCU
Robot Books
Shop
Contact
SKILLS
How To Build
A Robot
Tutorial
Calculators
Mechanics
Programming
Miscellaneous
Robots
Space
HARDWARE
Actuators
Batteries
Electronics
Materials
Microcontrollers
Sensors
SCIENCE
Robot Journals
Robot Theory
Conferences
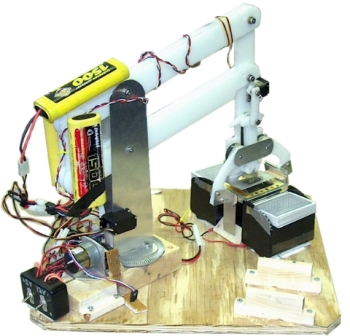
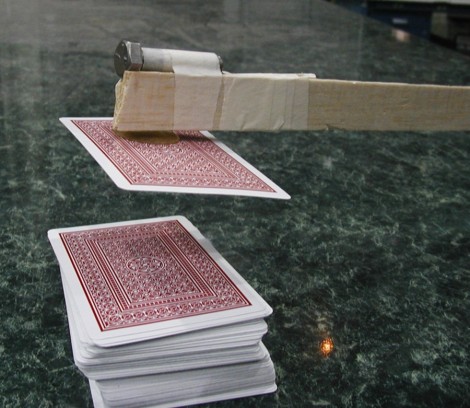
Me and two friends built this robot arm for our mechatronics class at CMU in spring of 2004. It was capable of shuffling cards, cutting the deck twice, and dealing cards to any number of players.
(Interestingly, the three of us formed a team of electrical engineer, mechanical engineer, and computer scientist - a perfect spectrum!)
At the time I had a poor quality digital camera that could only take 15 seconds of film, so I was never able to film an entire successful run. I made sure I included the bad prototype runs in the video, but towards the end of the class we got it to work perfectly 75% of the time. The other 25% was due to some occasional mysterious encoder error we were never able to figure out.
Enjoy the video!
Prototyping Design
Being one of my early robots I had not yet become very proficient at designing a robot.
Apologies for the ghetto-ness . . .
Anyway, the first challenge was to design a way to pick up individual cards. After much thought we decided a suction cup would be best. This is our initial design of an arm with a suction cup. Obviously 3D CAD wasn't so common back in the day . . .

To test the concept we bult a mockup - a suction cup attached to a stick!
This is very hightech stuff . . .
Then we hooked up the stick to two servos to see if we could apply enough suction force to lift the card up (just like in the above sketch). The servos were remote controlled. We found that a small weight (a steel bolt) attached to the stick end helped increase force.

It worked decently well, so we continued on . . .
Gripper Design
Robot hand grippers should always be specialized to the task.
What made this gripper more challenging is that it had to do more than just pick up
individual playing cards. It also had to cut the deck in three!
So we needed a clever way to do both . . .
So I used 2D CAD to throw some measurements together . . .

And got it to work like this animation. The edged blades were used to cut and pick stuff up, while the suction cup just picked up individual cards.
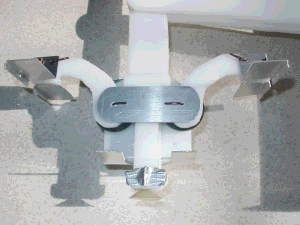
Here is a close-up of the gripper. This is after we added the servo and driving linkages. Its hard to see, but between the center linear shaft and the rotating edged clamps are two high-friction (no slip) rubber wheels.

And a mathematical analysis . . .


(asleep yet?)
Arm Design
Now its time to attach the gripper to an arm. First, an advanced
MS Paint diagram:

And more math . . . a basic statics analysis.

Here you can see a mockup built from scrap wood.
The arm is based on a parallel bar design. I had to do some basic stress analysis
on the beams to make sure it didn't sag too much.

Then we swapped to using HDPE and aluminum to build the entire robot arm. One servo drove the parallel bars, one servo for the gripper, and one geared down DC motor for arm rotation.
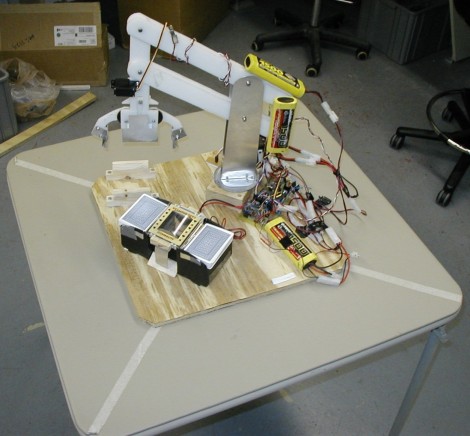
If you haven't noticed already, we attached our batteries on the back end of the robot arm. Why? Well, we needed a counter weight, and batteries are heavy . . . obvious now? =P

Electronics
More of a rats nest than anything else, we programmed the robot arm using a PIC16F877.
We had to use an external zero insertion force PIC programmer so we kept several PICs
around to swap out quickly. A motor driver IC controlled the DC motor.
The motor had a PID control algorithm with a homemade encoder.
We blame the failures of the arm (see video yet?) mostly on the unreliable encoder . . .

The arm had two power sources: one 7.2 NiCAD battery (regulated to 5V) for the electronics, while two other unregulated 7.2V NiCAD's were put in parallel to drive the motor and two servos. I wonder what these mislabeled buttons do?

The whole system never drew more than about 3 amps at any time.
If you want to learn more about the theory behind building and programming robot arms, please check out my robot arm tutorial page.
Society of Robots copyright 2005-2014