
 Search Here
MISC
Parts List
Robot Forum
Chat
Member Pages
Axon MCU
Robot Books
Shop
Contact
SKILLS
How To Build
A Robot
Tutorial
Calculators
Mechanics
Programming
Miscellaneous
Robots
Space
HARDWARE
Actuators
Batteries
Electronics
Materials
Microcontrollers
Sensors
SCIENCE
Robot Journals
Robot Theory
Conferences
- Self balancing robots
- Tilt-mode game controllers
- Model airplane auto pilot
- Alarm systems
- Collision detection
- Human motion monitoring
- Leveling sensor, inclinometer
- Vibration Detectors for Vibration Isolators
- G-Force Detectors
An accelerometer measures acceleration (change in speed) of anything that it's mounted on. How does it work? Inside an accelerator MEMS device are tiny micro-structures that bend due to momentum and gravity. When it experiences any form of acceleration, these tiny structures bend by an equivelent amount which can be electrically detected. Today, accelerometers are easily and cheaply available, making it a very viable sensor for cheap robotics hobbyists like you and me.
Watch a demo I made of using a microcontroller and an accelerometer to control a servo:
Applications for Accelerometers
Accelerometers are very important in the sensor world because they can sense such a wide range of motion.
They're used in the latest Apple Powerbooks (and other laptops) to detect when the computer's suddenly moved
or tipped, so the hard drive can be locked up during movement. They're used in cameras, to control image
stabilization functions. They're used in pedometers, gait meters, and other exercise and physical therapy
devices. They're used in gaming controls to generate tilt data. They're used in automobiles, to control
airbag release when there's a sudden stop. There are countless other applications for them.
Possible uses for accelerometers in robotics:
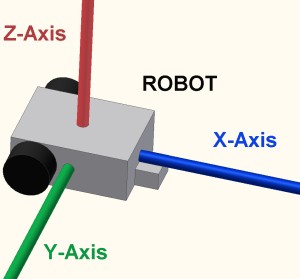
Axis of Acceleration
The tiny micro-structures can only measure force in a single direction, or axis of acceleration.
This means with a single axis measured, you can only know the force in either the X, Y, or Z directions,
but not all. So if say your X-axis accelerometer endowed robot was running around and ran into a wall
(in the X direction). Your robot could detect this collision. But if say another robot rammed into it
from the side (the Y direction), your robot would be oblivious to it. There are many other situations
where a single axis would not be enough. It is always a good idea to have at least 2 axes (more than one axis).
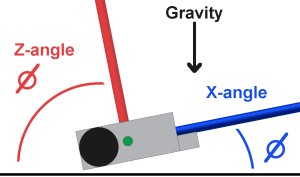
Gravity
Gravity is an acceleration. A such, your accelerometer will always be subject to a -9.81 m/s^2 acceleration
(negative means towards the ground). Because of this, your robot can detect what angle
it is in respect to gravity. If your robot is a biped, and you want it to always remain balanced
and standing up, just simply use a 2-axis accelerometer. As long as the X and Y axes detect zero acceleration,
this means your robot device is perfectly level and balanced.
Accelerometers, Rated G
When you buy your accelerometer, you will notice it saying something like 'rated at 2g' or
'3g accelerometer.' This is the maximum g force your sensor can report.
Gravity accelerates objects at 1g, or 9.81 m/s^2. For example, if your robot is moving at 1g upwards,
then that means you sensor will detect 2g. For most robotics applications a 2g rating will
be fine. So why not just get the highest rating possible? The lower the rating, the more
sensitive it will be to changes in motion. You will always have a more fine tuned sensor the
lower the rating. But then again, more sensitive sensors are more affected by vibration interference.
Calculate Acceleration and Angle wrt Gravity
To calculate the magnitude of acceleration for a
single-axis accelerometer
- acceleration_max = sqrt(x^2) = x
2-axis accelerometer
- acceleration_max = sqrt(x^2+y^2)
3-axis accelerometer
- acceleration_max = sqrt(x^2+y^2+z^2)
To calculate the detected force on an accelerometer due to gravity:
- Force_gravity = -g*cos(angle) (depends on starting axis of sensor)
Chances are you would have no need to measure the force, but if you reverse the equation
you can calculate the angle by knowing the detected force:
- cos(sensor_value*conversion_constant / -g)^-1 = angle
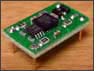
Availability and Cost
The MEMS IC's are easily available and very affordable. However they all require support circuitry
and come as surface mounts. I highly discourage buying an IC and doing your own wiring.
However there are many already setup accelerometer packages you can buy. For example,
Dimension Engineering has a great
plug and play dual axis accelerometer which requires no additional support circuitry.
There are several other great sensors out there, some as a 3-axis, and now some even with built in
rotation sensor gyros!
Wiring Requirements
Any accelerometer package will have a power and ground line, and a single output analog pin for
each axis of acceleration. Some of the sensors come with additional features/pins, read their datasheets.
Additional Tips and Uses
Placing an accelerometer on a mobile robot that experiences bumps can trigger the accelerometer unintentionally.
Use a capacitor to smooth out
output over several hundred milliseconds (testing required) to prevent this.
Also, read the interpret sensor data tutorial to enhance
your accelerator sensor accuracy.
Society of Robots copyright 2005-2014