 Search Here
MISC
Parts List
Robot Forum
Chat
Member Pages
Axon MCU
Robot Books
Shop
Contact
SKILLS
How To Build
A Robot
Tutorial
Calculators
Mechanics
Programming
Miscellaneous
Robots
Space
HARDWARE
Actuators
Batteries
Electronics
Materials
Microcontrollers
Sensors
SCIENCE
Robot Journals
Robot Theory
Conferences
- The LED and detector have very narrow emission and detection angles, so it matters a LOT how you place them. Place the LED and detector an 1/8 to a 1/4 inch apart maximum, basically parallel and almost contacting.
- Many objects are opaque to visible light (that means light doesn't pass through it, like wood, black plastic, metal), but are transparent to IR light. Black plastic is a good example. Many forms of black plastic are transparent to IR light, and therefore doesn't make a good shielding material. Aluminum foil covered with electrical tape works as a great shielding material.
- Most consumer video cameras can see IR light. This is really useful, since you can aim your video camera at the robot, and see the emitted IR light. Many emitters are strong enough that if you aim the robot at a white wall, and turn off all other lights in the room, you can see how the IR light is projected from your robot. Good debugging aid.
- Another debugging aid is an IR detection card that is available from Radio Shack, and other places. This little card has a material that changes the wavelength of IR light into something you can see. When IR strikes this card, it causes the card to light up and sparkle.
- Output your IR values on your computer screen real time to optimize positioning and Pot calibration (depends on if you want range detection or white line detection). You may also want to read the sensor interpretation tutorial.
- Often people cannot remember whether the black or the clear LED is the emitter or detector. This is the mnemonic I use to remember, dark colors absorb more light than clear, so the dark LED is the detector. Please note that this isn't always true, as I've heard of a blue emitter and clear detector sold by RadioShack. The easiest way to tell is point a digital camera at it, as most cameras can see IR light.
- If you plan your robot to work outside, make sure sunlight does not interfere with your sensor readings. The general rule of thumb with sunlight shielding is if you cannot see any data reading difference inside or outside, your sheilding is effective enough to work. Film canisters or electrical tape works very well. A modulated signal (such as in remote controls) also reduces external interference.
- Depending on resistor values, your IR circuit can be tweaked to better detect color instead of distance.

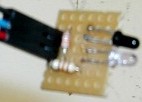
The Infrared emitter detector circuit is very useful if you plan to make a
line
following robot, or a robot with basic object or obstacle detection.
Infrared emitter detector pair sensors are fairly easy to
implement, although involved some level of testing and calibration to get right.
They can be used for obstacle detection, motion detection, transmitters, encoders,
and color detection (such as for line following).
I highly recommend reading the color sensor tutorial to understand more about infrared.
Note: If you are willing to spend $10-$20 for higher accuracy and better range, considering looking into the Sharp IR Range Finder.
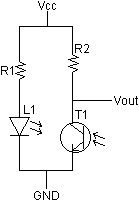
Infrared Emitter Detector Basic Circuit

|
R1 is to prevent the emitter (clear) LED from melting itself. Look at the emitter spec
sheet to find maximum power. Make sure you choose an R1 value so that
Vcc^2/R1 < Power_spec. Or just use R1 = 120 ohms if you are lazy and trust me. R2 should be larger then the maximum resistance of the detector.
Measure the resistance of the detector (black) when it is pointing into a dark area and then
choose the next larger resister. This means Vout is close to maximum when there is no signal.
|
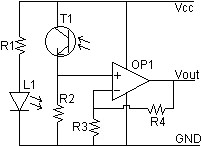
Infrared Emitter Detector Amplified Signal Circuit

|
R1 = 150 ohms (calculate as above)
R2 = 220 Kohms (calculate as above, or use Pot for white line following) R3 = 4.7 Kohms R4 = 10 Kohms OP1 = Operational Amplifier LM358 package includes two op amps. Vcc = +5 Volts |
Notes:
R3 and R4 determine the amplification of the op amp, gain = 1 + R4/R3. An appropriate ratio can be determined by connecting up the circuit and measuring the voltage entering the op amp and knowing the threshold value needed at Vout. Vout = (1 + R4/R3)Vin so just solve for the ratio using the values for Vout and Vin.
Additional Notes:
Society of Robots copyright 2005-2014