
 Search Here
MISC
Parts List
Robot Forum
Chat
Member Pages
Axon MCU
Robot Books
Shop
Contact
SKILLS
How To Build
A Robot
Tutorial
Calculators
Mechanics
Programming
Miscellaneous
Robots
Space
HARDWARE
Actuators
Batteries
Electronics
Materials
Microcontrollers
Sensors
SCIENCE
Robot Journals
Robot Theory
Conferences

Before starting this tutorial, please read my bootloading tutorial (coming soon!) and my UART tutorial! You must also already have a UART connection set up on your robot for this to work: $50 Robot UART tutorial.
As you should know, when I finish my other bootloading tutorial, is that bootloaders are software that can replace your hardware programmer. Instead of hooking up a programmer, you can program using a serial connection. You will need a programmer to upload the bootloader, but you won't ever need the programmer again, except for maybe programming fuses or lockbits.
Now that you understand what a bootloader is and the benefits for one, now I will demonstrate how to install a bootloader onto your $50 Robot or any other robot with an ATmega microcontroller.
We will be using a bootloader that has an auto-baud feature, where your microcontroller will attempt to reconfigure its internal baud settings to ensure proper bootloader configuration. This does not mean your other hardware will auto-configure, soooo . . .
Important: Make sure that all your external hardware is set to the same exact baud rate or this will not work!
Just for reference, the bootloader I selected is the open source fast tiny & mega UART bootloader. This bootloader is a bit buggy, comes with zero documentation, and not much in comments in the source code . . . but it's the best I've found that can handle a wide range of ATmega types. I've made some small config changes to it for use on the $50 Robot, and those files will be downloadable later in this tutorial.
Configure BAUD (if you haven't already done so)
Click:
Start->Settings->Control Panel->System
A new window will come up called 'System Properties'. Open the Hardware tab and click device manager. You should see this:
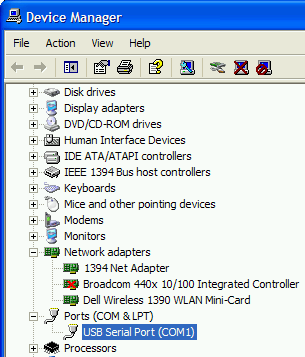
Go to Ports, select the one you are using, and right click it.
Select Properties. A new window should come up, and select the Port Settings tab:
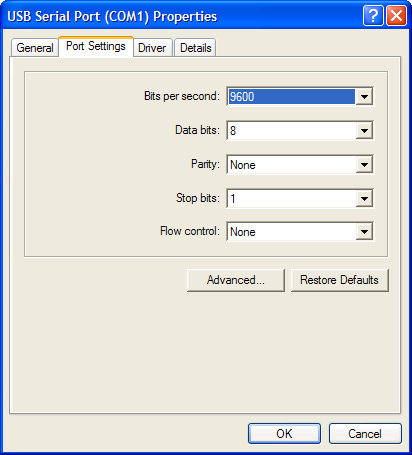
Now configure the settings as you like, as described in the UART tutorial.
Upload Bootloader
You have two options here. You can either use my precompiled bootloader:
ATmega8 Bootloader hex file
ATmega168 Bootloader hex file
Axon USB Bootloader hex file
beta v2.1 Bootloader files
and then upload it using AVR Studio.
Or you can custom modify it for your specific setup/ATmega. In the following steps I'll explain both.
update: new bootloader software is available
Programming your own Bootloader
Note: If you do not plan to modify the bootloader code, you may skip this step.
Open up AVR Studio, and in the Project Wizard start a new project called bootloader:

Make sure you select 'Atmel AVR Assembler' since we will be programming in Assembly. Don't worry, its mostly done for you already. You do not need to program in Assembly to write a bootloader, but the particular bootloader we are using is written in that language, and so we must compile for it.
Click Finish, and the new project should load up.
Install Files
Now, download this zip file, and unzip it into your bootloader directory:
Bootloader Source Files (v1.9)
Bootloader Source Files (v2.1)
note: this tutorial teaches only v1.9, but v2.1 is better
Now you must also put your own robot program .hex into the bootloader file as well. For example, suppose you just modified your own custom photovore code and you compiled it. Take that compiled .hex and place it into your bootloader folder. Don't forget to do this every time you change your custom code!
Optional: Compile Code
Note: If you do not plan to modify the bootloader code, you may skip this step.
Look for a file that matches the microcontroller you are using. For example, if you are using the ATmega168, look for the file M168.asm. Open that file up, and copy/paste the contents into your bootloader.asm that is already open in AVR Studio.
Now looking at the datasheet of your microcontroller (pin out section), verify that the Tx and Rx pins are correct in bootloader.asm. This is an important step, and in rare cases can break something if you skip this step!!! Make any changes as needed.
For example, this is what it should look like for both the ATmega8 and ATmega168:
.equ    STX_PORT        = PORTD
.equ    STX_DDR         = DDRD
.equ    STX             = PD1

.equ    SRX_PIN         = PIND
.equ    SRX_PORT        = PORTD
.equ    SRX             = PD0
Now compile it by pressing build:

Upload Code to ATmega
Now that you have your new custom bootloader .hex file, you need to simply upload that to your microcontroller. Use your hardware programmer like you have always done:

And finally, you need to program a fuse to tell it to use the bootloader.
IMPORTANT: If you change the wrong fuse you can possibly destroy your ATmega! Don't change any other fuses unless you know what you are doing!
You want to set BOOTRST to 0 by checking this box, and then pushing Program:

Your Bootloader is Uploaded and Ready!
Now disconnect your programmer cable. You won't be needing that again!
You will need to power cycle your microcontroller (turn it off then on again) after uploading your bootloader for the settings to take effect.
update 2010: A GUI version of the bootloader can be found
on the Axon II setup tutorial.
Now open up a command prompt by going to
start->Run...
and typing in 'cmd' and pushing ok:
A new command prompt should open up. Using the command 'cd', go into the directory
of your bootloader files. See below image for an example.
With your robot turned off and UART ready to go, type in this command:
38400 is your desired baud (9600, 38400, 115200, etc)
c1 is your com port (c1, c2, c3, etc)
'file' is the name of your program you want uploaded.
The filename MUST be 8 characters or less or it will not work (a bug in the software),
and the file must be located in the same folder as fboot.exe.
For example, if photovore.hex was your file, do this:
Press enter, and now you will see a / symbol spinning. Turn on your robot,
and it should now upload.
This is what you should see upon a successful bootload:
For some unexplained reason, I occasionally get an error that says:
If you get this error, just repeat this step again and it should work.
note: after typing in a command once into the command prompt, you
do not need to type it again. Just push the up arrow key to cycle through
previously typed commands.
What if I did the tutorial but its still not working/connecting?
Chances are you missed a step. Go back to the beginning and make
sure you did everything correctly.
Try power cycling your microcontroller.
Make sure the hardware programmer is unplugged.
Make sure baud is configured properly on ALL of your hardware
and ALL of your involved software.
Make sure no other device is trying to use the same com port at the same time,
such as AVR Studio, HyperTerminal, etc.
Some mistakes that you can make will cause your command prompt window
to freeze up. Just open up a new window and try again.
Some users have noticed that too many unused globabl variables in your source code will cause problems.
See this forum post for more info.
And a side note . . . this bootloader can only connect with com ports 1 to 4. The
developer of the bootloader for some odd reason thought there isn't anything
wrong with this decision . . . If you need a different port, go to the com port settings
and change the port you are using.
Also to note, some of your UART hardware might not be fast enough as the software
doesn't wait for hardware to keep up. The
Easy Radio module will
not work, for example. A direct serial/USB connection will work without a problem.
Upload YOUR Program Through UART

fboot17.exe -b38400 -c1 -pfile.hex -vfile.hex
-pphotovore.hex -vphotovore.hex
(yes, you need to say it twice, with p for the first time and v for the second time)

Bootloader VFFFFFFFF.FF
Error, wrong device informations
The Bootloader Didn't Work?!
Society of Robots copyright 2005-2014