
 Search Here
MISC
Parts List
Robot Forum
Chat
Member Pages
Axon MCU
Robot Books
Shop
Contact
SKILLS
How To Build
A Robot
Tutorial
Calculators
Mechanics
Programming
Miscellaneous
Robots
Space
HARDWARE
Actuators
Batteries
Electronics
Materials
Microcontrollers
Sensors
SCIENCE
Robot Journals
Robot Theory
Conferences
- a chance/opportunity
- outside guidance
- wires
- screws
- four 1.5V batteries (rechargeable NiMH are best)
- cardboard
- waterbottle
- two rubber bands
- chopsticks/popsicle sticks
- scotch/duct tape
- serial port on your computer
- if no serial port, get a usb to serial adaptor cable
- sharp scissors
- soldering iron
- solder roll (22 to 25 gauge)
- multimeter (not required, but good to have)
- safety goggles (you only have two eyes)
STEP-BY-STEP ROBOT TUTORIAL
STEP 1: UNDERSTAND THE ROBOT
Build a quality robot for under $50 - on your own!
Motivation
Before we get started, I want to tell you about the motivation behind writing
this tutorial.
I remember back when I began building my very first robot. I had been wanting to build robots for years, since 3rd grade actually. I was completely fascinated by them. But unfortunately I never had any outside influence to do this - none. Not a single person I knew understood what even a resistor was good for, even through highschool! No one to help me, no one to explain anything, no guidance from teachers, no SoR either! I bought robot like toys, dabbled with electronics, but didn't have a clue on where to start. Nature, failed by nurture . . .
Then in my sophomore year in college, I took my first robotics class. The professor gave us an optional project to build our own robot, and offered money to anyone up to the challenge. It was my chance! Still had no idea what I was doing, but I had money to do it!
I immediately started drawing up plans, and began talking with people. Still clueless, I spoke to two mechanics, a biochemist, a CS prof. Combined I knew enough to go to Home Depot and buy a bunch of steel beams that I knew somehow magically connected together. Soon after, I remember walking into the CMU Robotics Club and saying 'I have these steel beams and I want to cut them to size, how do I do it?' At first confused by my high level of incompetence, they agreed to show me how to use the bandsaw. From that point on, if I needed help, I knew where to find it. Ok so my first robot was a complete failure, but its where I learned all the basics to get me started on my own . . . and the rest is history . . .
The point of that story is that people need just two things to build a robot:
As you have realized, SoR has been the outside guidance people need. Got a question? Post it in the forum. Need expertise? Read the many tutorials. But what I haven't offered, at least up to now, is an opportunity.
About This Tutorial
What I am offering in this tutorial
is an opportunity for you to build your own very first robot, step-by-step, for under $50.
I spent the time to design a robot for you, the beginner, based on three metrics.
The first is simplicity - it has to be something that can be easily done by anyone,
where mistakes are hard to make and easy to fix. The second metric is cost - most people
typically cant spend more than $50 to $100 on projects like this. The robot kits you
can buy, at least the good ones, all cost more than $100 thereby making them very
prohibitive to buy. The last metric is quality. I can design for you a robot that
costs under $25, but it would probably take you 5x longer to make it, and would be
significantly harder for you to understand anything. I dont want you to
be a lemming, I want you to understand, too.
But that's not all I'm offering in this tutorial. I'm also going to teach you the basic steps to going about designing and building all your future robots. And I am going to do it in a manner so you can use tools from around your house and the local hardware store.
Serious About Robotics?
One more thing before we begin. Ask yourself how serious you are about robots. Do you just
want to just try it out? Maybe make something for your child to learn with? Perhaps encourage
your highschool students in the direction of engineering? Or do you want to study it in college?
Maybe you want robotics to be your professional career? If you fall in the latter two categories,
you need to stop being cheap. Seriously, if you want to be a professional, you need to go all
out. Buy yourself some good equipment, make investments in robot parts, don't cut corners
because of cost. Of course, you don't need to go out buying $5k laser rangefinders, but don't spend
10 hours making an accelerometer when you can buy one for $10.

If you are a serious builder, build/buy your robot parts under the assumption they will be scraped for robots in the future. Beginners often spend between $100-$400 for their first 2 or 3 robots, while experts spend about $0-$40 for their robots. Why is this? Its because they made the long-term investment. If you are going to build robots the rest of your life, spend for the long term. The investment will pay for itself. In all honesty, you may end up spending $150+ for this robot, but if you are willing to make the investment, in the long term it will pay off. Either way, I will give multiple options throughout the tutorial to match each persons wallet (or lack of).
Speaking of which, are you just too poor to invest? If you want to know more about paying for robots, read my robot funding tutorial.
And just so you know, I designed this robot in such a way that people who arent serious wont waste money, and those who are serious get good parts to scrap for their next robot. A quality robot, for under $50. =P
Beginning the Tutorial - Design and Part Selection
As I mentioned, I will teach you the process of making a robot, as you make it. The very
first step anyone would make would be to design your robot. Interestingly this is where
beginners fail. Beginners spend 90% of their time building, and 10% designing. Experts
are the opposite - 90% designing and 10% building. Of course when you are a beginner its hard
to design - you dont always know what works until you try it. But planning never
hurts.
A good example of planning a robot would be the CAD work I did for my sumo robot, Stampy:

Typically the design phase is an iterative process/cycle between design and part selection, meaning the designer juggles between the design he would like, and the affordable parts available on the market. The designer will keep redesigning until both reach a harmony - often a long and tedious task. There have been several times where I spent a week designing a circuit, only to find out a key chip I need has been sold out and no longer exists! It forces me to redesign the whole darn thing. Pain!
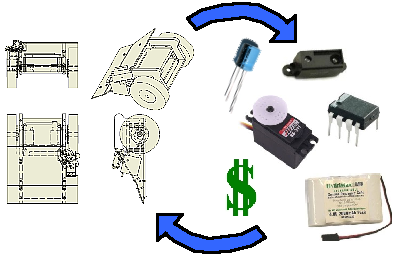
But lucky for you, I designed this robot using highly available, easily replaceable components. For this tutorial you can mostly skip the design/part selection phase, but its still a very important skill you will need to learn. In the future, if you are looking for robot components, I have written up a robots parts list to save you time.
Parts List
Starting you off, these are the parts you need to purchase. Buy them right after you
read through this tutorial, but before you start building anything. That way the parts
have time to ship while you are building the robot chassis. Note that some of the parts
in the optional list can replace the more expensive parts in the required list. Also,
some members have complained about shipping practices at Digikey.com, so just
search for the parts at mouser.com instead if you feel you may have a problem.
Required Parts:
| Item | Cost each ($) | Quantity | Website, Part # |
|
Hitec HS-311 servo (modify the servo) |
8.99 | 2 |
Servocity.com 31311S |
| 5V Linear Regulator | .50 | 1 |
DigiKey.com KA7805ETU-ND |
| ATmega8 AVR | 3.66 | 1 |
DigiKey.com ATMEGA8-16PU-ND |
| 28 pin DIP socket | 1.68 | 1 |
DigiKey.com ED3128-ND |
|
220uF+ Electrolytic Capacitor |
.32 | 1 |
DigiKey.com 565-1038-ND |
|
.1uF Ceramic Capacitor |
.13 | 1 |
DigiKey.com 399-4454-1-ND |
|
36 position breakaway male header |
1.74 | 2 |
DigiKey.com WM6436-ND |
| 340ohm resistor | .95 | 5 pack |
DigiKey.com PPC340YCT-ND |
| 1.62Kohm resistor | .49 | 5 pack |
DigiKey.com 1.62KXBK-ND |
| LED | .19 | 1 |
DigiKey.com 160-1034-ND |
| CdS Photoresistors | 2.99 | 5 pack |
RadioShack 276-1657 |
|
Grid-Style PC Board with 371 Holes |
1.99 | 1 |
RadioShack 276-149 |
And more optional parts.
You will need one of the listed programmers (I will explain
the difference later in part 4).
|
Enclosed 4 AA Battery Holder (with On/Off switch) |
1.99 | 1 |
RadioShack 270-409 |
| 9V Battery | .25 | 1 | any store |
|
6v 2000mAh NiMH Battery |
10.00 | 1 |
all-battery.com |
|
AVR STK Serial Port Dongle Programmer |
12.95 | 1 |
SparkFun.com PGM-00014 |
| AVR ISP2 Programmer | 34 | 1 |
DigiKey.com ATAVRISP2-ND |
| Pocket AVR Programmer | 14.95 | 1 |
SparkFun.com PGM-09825 |
Part costs may change due to market factors. Last price update Dec 2008 . . . prices go up with inflation so at some point it'll be over $50 for sure!
Although not necessary, I posted the datasheets of all parts (4mb) for more information.
If you live in Britain, a generous user has suggested this parts list to save you money in shipping. Thanks Paula! And if you live in Australia, Smash has suggested this parts list.
Tools/Misc List
Ok so to be honest, you will probably have to spend more than $50 on your robot.
This robot was designed to use parts you are likely to have around your house, or that can be borrowed from friends or school
. . . but if you like live in a box, and don't have friends or something, you might have issues finding these items.
If you cant find any of these items, your local hardware store will have them. Remember, if you are serious about robotics, make an investment in good tools and equipment.
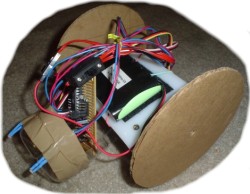
What Kind of Robot Are We Going to Build?
In one sentence: we are going to build a
differential drive robot, using the
photovore algorithm,
with photoresistors,
capable of basic object avoidance.
This means your robot can run around your house without
running into objects such as furniture and your cat . . . preferably just the
furniture . . . Please read those tutorials before continuing, as they can give
you a fundamental knowledge of what we will do in this tutorial series.
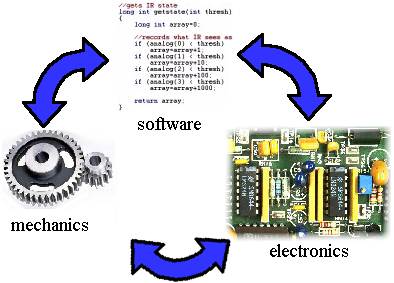
The Balance - Mechanics, Electronics, and Software
You have probably noticed how I often divide robotics up into these three separate categories -
such as I do in the forum. This is because making robots involves three independent
skills. Only combined, can you make a functioning robot. When a robot designer makes a robot,
he has to account for all three in the design phase so that each falls into balance.
But for this tutorial, I will do one at a time to make it easier for you to understand.
First will be mechanics where we build the robot, then electronics where we hook up the brains
and sensors, and finally software will be written to program the robot.
Now that you are ready to start making your very first robot,
continue on to Step 2: Build Your Robot Chassis >>>.
Society of Robots copyright 2005-2014