
 Search Here
MISC
Parts List
Robot Forum
Chat
Member Pages
Axon MCU
Robot Books
Shop
Contact
SKILLS
How To Build
A Robot
Tutorial
Calculators
Mechanics
Programming
Miscellaneous
Robots
Space
HARDWARE
Actuators
Batteries
Electronics
Materials
Microcontrollers
Sensors
SCIENCE
Robot Journals
Robot Theory
Conferences

The Bootloader
Part #1: Installing Software
Part #2: Setting up Hardware
Part #3: Using the Bootloader
note: If you are using Linux or Mac, please see the FAQ
note: Your system must be 32-bit to use the bootloader (if you don't, use a virtual machine, or a hardware programmer).
If you already own a hardware programmer, using the bootloader is optional. Just plug into the ISP header and program the Axon directly. The bootloader is just there to save you the $36 of buying a hardware programmer.
Note that the hardware programmer will overwrite the bootloader - but you can always reupload the bootloader (or other program) if you wanted.
STEP 1: Download Bootloader
The bootloader is what you use to upload your code through USB to your Axon. Download and install the .exe into the same folder that you have your compiled robot code.
FBOOT v1.7 EXE (17kb)
Optional: If you'd like to modify the bootloader, download it here:
FBOOT17 Axon source code (63kb)
latest beta bootloader software is available
The latest FBOOT version and source code (not SoR tested) can be found on the fast tiny & mega UART bootloader project page. It comes with zero documentation, but I have instructions on how to use and adapt this bootloader for your own use on the $50 Robot Bootloader Tutorial.
If you are using Linux or Mac OS X, you may try this bootloader.
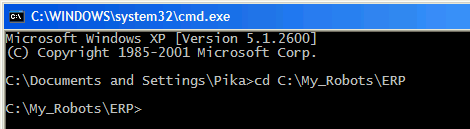
STEP 2: Go to Code Folder
Now open up a command prompt by going to
start->Run...
and typing in 'cmd' and pushing ok:

A new command prompt should open up. Using the command 'cd', go into the directory that has your code and FBOOT17.exe. In this example, my code is in the folder called ERP:
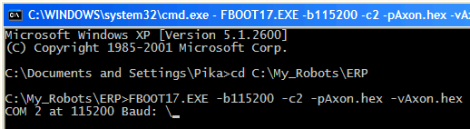
STEP 3: Run Bootloader
TURN OFF YOUR AXON
With your Axon turned off and USB ready to go, type in this command:
FBOOT17.EXE -b115200 -c1 -pfile.hex -vfile.hex
115200 is your desired baud (9600, 38400, 115200, etc). The bootloader has an 'autobaud' feature, so it's likely to work under most baud settings. Try a lower baud rate such as 38400 if it doesn't work.
c1 is your Axon USB COM port (c1, c2, c3, etc) as shown in your Device Manager (see step 3). The bootloader only allows c1 to c4.
'file' is the name of your program you want uploaded. The filename MUST be 8 characters or less or it will not work (a bug in the bootloading software).
For example, if Axon.hex was your file, do this:
-pAxon.hex -vAxon.hex
(yes, you need to say it twice, with p for the first time and v for the second time)
Press enter, and now you will see a \ symbol spinning.
STEP 4: Turn On Axon
Turn on your Axon, and it should now upload your .hex file.
This is what you should see upon a successful bootload:
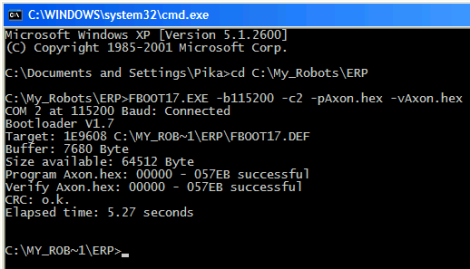
Remember, the bootloader must always be activated BEFORE you turn on the Axon or it will not work.
note: after typing in a command once into the command prompt, you do not need to type it again. Just push the up arrow key to cycle through previously typed commands.
note: if it takes more than about ~8 seconds to load your code, please see the FAQ on how to speed up your bootloader.
You can also set up a shortcut that stores your typed information. Check this forum thread for more info.
It didn't work? Read the bootloader debugging checklist.
STEP 5: Be Happy!
Congrats, you just programmed your Axon successfully!
The next step would be to write your own code. Check out the Axon Function List for programming help.
If you want free webspace to post your project, check out the SoR Member Pages. If you make anything neat with the Axon, or want to see what others have done, send me a heads up and I'll post your project on the Axon Examples.
Society of Robots copyright 2005-2014